Showing posts with label Silk. Show all posts

Tuesday, February 27, 2018

HSF #2: 1880's Reproduction Corset

The goal with this corset: to make an awesome corset, no skimping on the flossing, all the way through, that could work under an 1880's dress.


I wanted to not get too crazy with color choices, so I looked around at all the corsets within this time frame. Overall, I really liked this particular corset because the seam lines were very comparable to the Truly Victorian pattern I already had. I copied the exact boning design; the back diagonal section I had to fudge a little because my corset overall turned out longer, and I think I may be a little smaller, so the exact angle is different. In fact, it didn't turn out the same on both sides, because I finally succcessfully got both sides even; so the one side has 6 diagonal, and the other 7.


c. 1880-85 Corset in the Royal Ontario Museum


After reading some articles and watching some videos, I decided to try roll-pinning. Roll-pinning is the theory that, if you pin something on a flat plane, and wear it on a curved sphere, the outside layer will be too small, and the inner too big. This process involves pinning the two layer together on a sphere; in this case, I used my larger pressing ham. His name is Hammie. The two layers were then hand-stitched together. It was a lot of work....because I haven't done more corsets, I don't know how it would have turned out if I hadn't pinned it like this. But overall, it lays pretty well without many wrinkles. So, success, I guess?

I also decided to try putting the seams on the outside (why?), and covered it with the boning channels. As I was constructing it, I wasn't sure why I picked that, but later it ended up coming in handy.
This is the closest I've come in corset-making to an even back.

Once the grommets, boning channels and busk were in, I tried it on. It had been like 6 months since the mockup had been worn. Initially, it took some time to figure out the best way to lace it up; the first time I laced it too tight in the ribs. Also, I stabbed my hands three times really hard because I pinned the bones in rather than baste across the top. Double hole for each stab, with the pin going in and out and I had to carefully draw it out. So I was hurting and frustrated. After coming back to it with more patience and time (and the bones basted in), I figured out the best way to lace it.

I only have two small regrets with this project that can technically be fixed:

1. The bust shaping. To fix the bust, I ripped the front casing off halfway and added in a really tiny gusset to round it out a little more. Once the seam allowance was trimmed and the casing back on, you can't even tell it's there! It's not perfect on one side, but better overall. Still want to perfect that.

2. I would never have even thought of the wider bone, except for the original, so I thought I'd try it. Whoops....didn't realize that exact seam line curves forward quite a bit, and it hits right at my hip bones. So the tighter I have it laced, the more the bone tweaks, although the hip bone thing is a little uncomfortable, but not as big a problem as I thought. Technically, I could remove the bone and leave the channel (it needs to cover the seam) and re-angle it so it's a little closer to my actual side, and more upright.

There are a few areas of this project that mystify me a little bit: the natural form tummy, and hip spring. Back in July, I had sort of a hip-spring revalation after adding gussets to my older corset. Wow! What a difference! So comfortable and attractive! I no longer looked top-heavy. With the old corset gussets, it gave me a lot more spring out the back. With this particular corset though, it gives me more spring out to the side, and more flatness in the back. Huh. Some people are amazing at that balancing act; I'm still trying to figure out if perfection is possible when you have less body to work with?!? Like, do I have to pick between the back or the side? And if I try to balance between the two will it not be so extreme and not even be worth trying?

The other undergarments made to go with this are a basic natural form petticoat, and a bum pad. Initially, the pad was made to wrap all the way around my hips to the side, but I decided that I was hippy enough without any help. Actually, I wasn't even going to make a hip pad, but after the petticoat was made it was clear that the silhouette was really, really sad without it. It took several tries to get this the right shape; I'm so used to mid-Victorian, with sudden fullness right below the waist, but to get the right shape it really needs to slope, with the fullness gradually being added the further down it gets.

The petticoat is the Truly Victorian pattern, the only adjustment being that I added a tie right at mid-thigh level to pull the fullness to the back. The bum pad is tacked on one side, and then the other side gets safety pinned to the waistband once the waist is tied. I found that the bum pad wouldn't stay up on it's own, and kept riding up in the front and falling down in the back. I'd rather have it sewn permanently to the petticoat, with the petticoat closing at the side front. But....I'm lazy, so that isn't happening.

What the item is: Natural form corset, petticoat, and pad. 
Material: Coutil, silk-faced satin, cotton sateen, muslin.
Pattern: TV 1880's pattern, and the TV basic petticoat
Year: 1870's-1890's for the corset, and 1877-1882 for the petticoat.
Notions: Metal busk, German plastic boning, 2 wider metal steels, thread, embroidery floss, twill tape, metal grommets, stuffing (for the pad)How historically accurate is it? The corset is based on an extant, and I can't think of any techniques which aren't accurate, other than the plastic bones. The stuffing for the pad is polyester, because there comes a point where you just don't care. Patting myself on the back with an 80%, although for natural form I'm a little flat in the belly area. I was wanting to make some combinations to finish this challenge off, but that's going to have to wait.
Hours to complete: 60 hours for the whole thing, started way back in July or August.
First worn: For my next project, it's been a constant on-off act, so I've already worn these undergarments for a few hours at a time maybe 8 times.
Total cost: $80; satin was expensive, coutil was stash, busk and boning was new, I had to buy a new grommet-setting kit because I was tired of the size 0's so I'm counting that as part of the cost. 

By the way....if you see any black galloon beading lace....LET ME KNOW. I searched high and low for something close, to no avail, and I wasn't willing to settle since it seemed like a simple request. 

Friday, August 4, 2017

#3: Extant Garment: 1861-65 silk dress

The next dress was dated to just 1860's, but I'm guessing it was made between 1861-1865 (read to the end for dating). The textile director told me that she believes it was a mourning dress. It is made of a very thin black silk, sort of like a tissue weight taffeta.
Photo Credit: Idaho Historical Museum

Photo Credit: Idaho Historical Museum

Photo Credit: Idaho Historical Museum

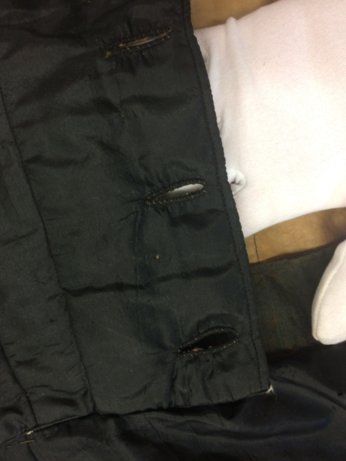
These were seriously super-strength buttonholes.
Photo Credit: Idaho Historical Museum
In the back, the pleats face towards the back; in the front, the pleats also face towards the back, which is a little less common than front-facing, but still relatively normal.  Photo Credit: Idaho Historical Museum

This dress was a little confusing, because of it's size. It was quite small, but it seems like a good guess that this dress was worn by a short lady. The total length was 38'' in the front, and the skirt circumference was only 115''. The modifications are very good and not theatrical. The skirt has a strip of about 2 1/2'' sewn onto the bottom that is discreet, but also wouldn't have been a part of the original design, and it also feels to be of a slightly different quality than the rest of the dress. The hem facing was only maybe 4'' high, and was of some sort of course brown stuff that almost felt like horsehair.
Photo Credit: Idaho Historical Museum


The inside lining also showed that the darts had originally been in a different location by the fading patterns, and then ripped out and moved over. Again, it was skillfully done, and despite the fading and stitch marks on the inside the outside showed no wear or stitch marks. I don't know how they managed that! How large the first darts were is difficult to discern. I did not get a very good picture of the fading, sorry!
You can also see the two different colors of lining.
Photo Credit: Idaho Historical Museum

The bodice closes up the front with functional buttons, but also has a row of hooks and eyes starting mid-bust going down to the waist to stabilize the whole thing. The shaped coat sleeves are unlined, and the only trim on the entire dress is a cuff-shaped piece sewn to just the outside portion of the dress with narrow braiding, also in black. The bodice was lined with two different shades of brown; the darker one in the front portion was twill, and the lighter color in the back was a plain weave that was either polished or plain, I can't remember.
Photo Credit: Idaho Historical Museum

A few construction peculiarities: the back curved detail seen on many dresses is actually a faux back; the entire back is cut as one piece, and then folded and top-stitched to appear to be three separate pieces. You can read more about how to do this in The Dressmaker's Guide. However, with this dress they didn't even bother to make a crease, there is simply a line of stitching! You can see in the large picture of the back how without the fold, it doesn't stand out quite so much; whether the maker was simply inexperienced, lazy, or pressed for time we will never know.
Photo Credit: Idaho Historical Musuem

The skirt has an excellent example of a dog-leg closure, and that striped fabric is a very short section of waistband that isn't visible from the outside. The skirt was attached straight to the bodice, except for a short portion that was attached to just the scrap band. The dress has piping on the neck edge, armscye, the bottom edge of the bodice and on the bottom edge of the sleeve.
Photo Credit: Idaho Historical Museum

The only thing we really have to work with is the sleeves, and the skirt. This style of sleeve is called a coat sleeve; a coat sleeve is characterized by being made of an outer piece and an inner piece sewn together in a curved shape. When the dress is hung up on a hanger, the sleeves will "shake hands". It's simple and tidy, and because it lays very flat it's a good base for a lot of fancy trim. Or, simply no trim. 
Mrs. James Guthrie, c. 1864-66, by Lord Frederick Leighton

The problem with coat sleeves, is that they are difficult to distinguish from a regular straight sleeve in a drawing; in photographs, it's pretty easy to see. The other problem with coat sleeves is that it seems as though fashion plates may have considered them "boring"; because of how many extant dresses have them, and how many women were photographed in them, we know they were very common. But based on a fashion plate.....you might not even know anyone wore them. Fashion plates still show them, but they generally are shown with undersleeves during the earlier 1860's. Like the previous pagoda sleeve fashion, except less droopy and still having a curved shape.

1861 Journal des Demoiselles; this particular example is an earlier style of coat sleeve that was only around for a few years, between 1860-1862. Sort of a cross between a coat sleeve, and a bishop sleeve. It has a lot of fullness at both the shoulder and the wrist, but unlike a plain bishop sleeve it has some shaping to make it curve inwards. 
1862 Petersons fashion plate; this is a good example of an open coat sleeve. It's very tailored, but still has a curved shape even though it's open. In 1862, we see examples like this, but also some that are larger and more open, but this was sort of the new sleek look. Some people still prefer to call all styles of open sleeve a pagoda sleeve. I prefer to think of a pagoda sleeve as having either no shaping on either seam, or some shaping on the front seam; open coat sleeves have shaping on the front and back seam, to keep it tailored and curved. To give it an exact title may be beside the point.
1863 Le Follet; this is the closest shape and size to the extant. It is a closed coat sleeve, meaning tapered to the wrist, and it's worn with cuffs instead of undersleeves. This is my no means cut and dry on the dating; there are dozens of examples from before and after this date that look just like this. It's a bit generic. Within the realm of photographs, we see a lot more variation on coat sleeve size, shape, and style than in fashion plate. Most photographs don't have a date, though.


1865 Les Modes Parisiennes; French fashion plates like this one were often recycled through American newspapers, but often 6 months to a year later! So this one may have not even made it to the states until 1866, if at all. The other fashion plates except for the Petersons follow this general rule as well. This style of coat sleeve is much more tailored, even from the extant dress, more common from 1864 all the way to 1870.

We see a few examples of coat sleeves in 1861, but they are increasingly more and more common each year, and are still fashionable even up until the early 1870's, although by then the shoulders were a bit less dropped.

The only other thing that we have to work with is the skirt. The skirt is constructed with plain rectangles, with the fullness about evenly distributed, with a little more towards the back. Right around 1864, most skirts are very commonly made with gores, although some women had been wearing gored skirts since 1861. The skirts are sewn with an angle so there is less fullness in the front at the very top. By 1865, they are gored enough so that there are almost no pleats in front. This skirt shape could have been worn as far as 1865, but even in that year it would have started looking a little outdated and would probably have been ripped apart to re-shape the skirt. 
1861 Journal des Demoiselles; this skirt shape is more generally round all the way around...
c. 1865, sold at auction.
While we don't know the exact date of this dress, the broad stripes show the gores I'm talking about. Goring the skirt takes out fulness at the top, which gives it a distinctly triangular shape at the top. The black extant dress uses straight rectangle panels, instead of triangle panels like this striped example. 

So between the sleeves and the skirt, it probably would have been constructed between 1861-1864, but could have been worn up until 1865-1866. It's also possible that it could have been made a year or two earlier, and then the sleeves redone in this year range. 

I also want to talk a little bit about who might have worn this dress before I go into mourning, because at a glance you might guess that it could have been worn by a child. The fullness is very narrow (115'' circumference), it's very short, etc. However (and this is a big however)....the difference between children's fashion and adult fashion is extreme. Children's dress, usually without exception during the 1860's, was not darted and boned. It also always closes up the back. The exception to this is sometimes you see pictures and fashion plates with buttons going down the front, but because there is no crease it is purely decorative, but even this is relatively uncommon. 


That being said - it could have been worn by a young woman who grew an inch or two in a couple places, but because most women stop growing between 15-17....it makes more sense that it was a hand-me-down. As a grown woman, you don't accidentally make it too short....you know exactly how long to make it. So this dress is most definitely a hand-me-down, or even possibly sold and bought second-hand. That also explains the dart placement; while I can't tell whether the old darts were larger or smaller, different body shapes need different placement, so I'm not even sure that matters.

Now, the final question: mourning or no?

While this dress is very plain, and possibly boring, this is a good example of what an average lady might have a best dress, or possibly just a conservative nicer dress. It fulfills what every magazine of the time describes as the dress for any occasion: black was considered to be in good taste, because it was never too flashy. And being over-dressed was, in several different magazine's opinions, vulgar and having good taste in dress often meant being cautious about sending the wrong message about your station through excessive dress.

An 1860's lady, in mourning

1860 Petersons:

"All the lighter kinds of mourning are a good deal affected by the changes in fashion; but the deepest style of black undergoes but little alteration, except in the shape of a bonnet, the cut of a sleeve, or the length of a sleeve. The material used is bombazine, and the trimming must consist only of folds of heavy English crepe. Broad folds of crepe may trim the skirt of the dress, but are not now considered as indespensible to deep mourning as formerly." 1.

Later in the same article -

"Where a less rigid kind of mourning is required, a fine black alpaca, or double width delaine, is worn.....with this dress, although black collar and sleeves are generally worn, still white crape, or tarleton collars, and sleeves are admissable. Black barege and grenadine are always used for summer wear in black, but the must be made very plainly and invariable worn over a black skirt and body lining".

"A still lighter kind of mourning is of black silk, trimmed with crape, or, if wished less deep, with black gauze ribbon, etc. The silk must be of a dead black and quite lustreless."

"After this stage of black, the style varies according to the fancy of the wearer. Small black and white plaids, purple and black, gray silks, lilac and white, are all worn for various depths of mourning.....in this stage of mourning, it is almost impossible to particularize the various combinations of colors, or the styles of dress. Much more trimming is allowable; lace or worked collars may be worn, gloves may be of lilac, gray or pearl...."
1860-65 dress that is a perfect example of half-mourning. From the Les Arts Decoratifs

So there is a common theme among the first few examples: BLACK. And not just any black, but things like dead black, or lustreless black. Crepe, bombazine, and barege in black colors actually absorb light; the reason being that they are made of wool or wool/silk mixture. A women in mourning is a bit like looking at a black hole. This dress is too shiny to be considered proper for full mourning; however, it is acceptable for half-mourning.
Two 1860's ladies, in deep mourning.


1861 Godeys "In first mourning, black crape collars and cuffs on grenadine or crepe sleeves will still continue to be worn. The English fashion of adding a gold thread to the applique pattern in crepe , may find favor in New York, and at the South, but scarcely in neat, plain Philadelphia, where mourning usually is mourning, and not a mass of crepe bows, bugles, and tinsel."

1862 Petersons; there was a pattern originally included, and while this wrapper isn't specifically for mourning, they give the suggestion that you make the dress in black delaine, with the front made in black silk quilted in white for mourning.

January 1862, from Englishwomen's Domestic Magazine; in the comments on these dresses, they give suggestions on how both can be adapted to mourning by making them in a combination of black, gray, purple and white. Because women in full mourning were not expected to attend social functions like balls or evening parties, we can assume they mean half mourning.

Even though we now have evidence that this dress is appropriate for half-mourning....did it have to be? The answer is no! Black was considered fashionable and appropriate for almost every occasion, and magazines often give many examples of fashionable black, gray, and purple clothing with no mention of mourning of any kind. 
1861 Portrait of a Lady, by Ferdinand Krumholz. 

How do we know the above lady isn't in half-mourning? She has a white collar, and if you look closely you will see that she has a green ribbon on her left side. Women in full or half mourning were expected to wear caps on their head that were usually white. On her right side, look even closer and you will see....flowers! This is simply a very conservative dress. 

BONUS: A recipe from Petersons for how to re-blacken faded mourning clothes. "Black reviver, for faded mourning dresses, black coats, etc. 1. Boil in two pints of water down to one, two oz. of Aleppo galls, in powder, two oz. of logwood, one oz. of gum arabic, then add one oz of sulphate of iron. This may be evaporated to a powder. 2. Galls, eight oz; logwood, green vitriol, iron fillings, sumach, of each one oz; vinegar, two pints. 2


1. 1860 Petersons, pg. 86

2 1860 Petersons, pg. 406
For further reading on mourning, here is a podcast with Samantha McCarty:
http://blog.americanduchess.com/2017/05/Podcast-Episode-2.html

Wednesday, August 2, 2017

#2: Current Projects

I have a couple projects going on at once.

This late Victorian corset has been fun; this is my first attempt at roll-pinning, so we'll see how that goes. I'm basing the boning pattern off of one from the ROM. There was a LOT of hand-basting involved.

Last year, I made a Regency evening gown (still no good pictures, sorry!). I ran out of time before the ball to truly reproduce the original sleeves I was basing it on and instead did a plain puff sleeve.  I pulled it out recently to replace them with the more interesting ones. The lower half cuffs are really interesting!

My computer is being finicky and now the picture is sideways....you get the idea. The cording is done by lining the cuff, then laying the cord between the layers. Instead of flat-sewing them into a channel, I sewed the curve that I wanted, then squished the cording up against it, then rolled the cord over the stitching line and did another row of stitches The result is that the cord is encased in only the outer layer, and the stitching is hidden beneath the cord. On the underside, there are two rows of stitches almost on top of each other. 

Which leads me to my next project, and the reason I ever revisited it in the first place. I was wanting something to wear over it, because it was rather boring, especially since I pin up the train for dancing. Open robes are automatically out, because they ALWAYS have a train in originals. I've seen costumers simply cut it floor length, but considering that we don't see any extants like that...that isn't the way to go about it. So the only parameters I was looking for were a colored garment of some kind that did not have a train.

Originally I thought a little sleeveless bodice, BUT....since you now know that I love research, I started researching designs. The white under-dress is appropriate for 1797-1802, so I tried to find a fashion plate within those dates. While going through several 1798-99 magazines, I found a few designs that showed what was called a half-robe. After looking through dozens of various half-robes and sleeveless bodices, I picked this one, because of the Neoclassicism; the Grecian lines are my favorite!
1799 Ladies Monthly Musuem

Janet Arnold has a pattern for a half-robe, but she states that they were only worn over a dress or petticoat for morning wear. However, the fashion plates and advice from 1799 clearly show a few that are intended for evening, or full Dress. A half-robe and half-dress are very different; a half-robe is a short robe, while half-dress refers to the level or formality of dress, being sort of half-formal.
Here is a 1799 half-robe for half-dress.....

...and a 1799 half robe for full dress! The image on the right is also a good example of the trained open robe I was referring to.

Since I love to be different, I decided that a half-robe it is! Especially since I haven't really seen one done accurately for formal wear. The Simplicity 4055 pattern (which I have successfully used several times) is an example of how most modern people interpret that look, by having the outer layer and overskirt sewn as one to the dress. Historically, the half-robe was a distinct look created by wearing a basic dress or petticoat, and then another dress over the top. This makes it easier to have many looks in one by simply swapping out the over dress, rather sewing them together.


So here is the draped half robe on my dress form. I was merely going for the overall shape and fullness ratio, obviously it will be a bit longer. I also wanted something that was easy, so essentially it is 2 rectangles with one corner cut off, sewn up the long edges only up to the waist edge. It will close with a drawstring around the waist, and some sort of clasp or pin on the shoulder. The original description says it should be a diamond clasp...however, I'm on a budget and cannot afford a diamond clasp.

I don't have the fabric for the half-robe yet, and I don't have the hardware for the corset yet. Funds are low, so I'm waiting to be paid in August to order supplies.

Wednesday, April 19, 2017

Extant Garment: 1850's Dress

This is Part Two in the 4-part series about a trip to the Idaho Historical Museum, in which I saw several different extant garments. See Part 1 here.

This next dress was simply written down as just 1850's; read to the end of the post to hear my thoughts on the actual dating of the dress.

This dress was absolutely breathtaking, but was ripped apart to some degree for theater. I did a pretty good job of not even bothering to take pictures of the modifications. Some of those things are: ripping off whatever lovely gauging was originally there and putting in a drawstring waist, shortening the skirt between the two tiers (although this was actually pretty discreet and might have been original), and putting in a large 3'' panel between the two front edges of the bodice because whoever wore it wasn't even close to small enough. That panel though....ack! If the dress is too small, then why bother?
Photo Credit: Idaho Historical Museum

The skirt panels were maybe the most beautiful fabric I've ever seen. They did a good job of matching the pattern across each tier, so it was close to seamless. The bottom ruffle measured 20'' from hem until the bottom edge of the next tier, then the next tier measured 18.5''. There was a section above that that didn't get measured, but the overall length was a little more than both of these combined. There was no hem along the bottom, because the print runs along the selvage, which was very small and neat. The skirt was lined with brown glazed cotton that stopped where the bottom tier was mounted on. The bottom edge had a narrow tape wrapped around it.

(Yes, that is a seam line right there)
Photo Credit: Idaho Historical Museum

The bodice is a solid gold silk, lined with the same brown glazed cotton as the skirt. The sleeves were so beautiful! They were open pagoda sleeves, lined with white silk halfway up. The inside of the sleeve was trimmed with box pleated white ribbon. The outside portion of the sleeve was trimmed with a matching brocade ribbon, 1 1/4'' wide and pleated, with tassels hanging from the points on the sleeves.
Photo Credit: Idaho Historical Museum
The back pleats were positively divine and laid so well, and thankfully hadn't been messed with. The original stitching on these was a little sloppy, but I think this dress must have fit it's original owner very well. A 5'' bone was stitched inside a casing up the center back; the total length of the pleating out the back measured 16.5'' from the natural waist to it's longest point.
Photo Credit: Idaho Historical Museum

This picture is of the underside of the basque, showing the sloppy stitching used to sew on the lower portion of the basque to the main bodice. 

Photo Credit: Idaho Historical Museum

The darts are boned with whalebone, with the bone being encased in a dart. The dart take-up was left inside the dress, but clipped. The waist of the bodice was 26.5''. The neck edge, armscye and bottom edge were all piped.
Photo Credit: Idaho Historical Museum
This dress might have been worn over a hoop petticoat or crinoline, which were invented in 1856. However, the 1858 Ladies Home Magazine advises that ladies choose the older style of horsehair or corded petticoat over the hoop skirt. Listen to this:

"....but, of course, a horse-hair skirt of modest dimensions, or a corded one is indispensable, unless a resort is had to hoops, and they take all the life, grace, and taste out of a skirt, by inflating it equally all round, instead of gracefully casting off the skirt more fully behind, and thus giving it an oval shape instead of a round hooped one." 1

A few key things I'm looking for to date this dress:

- A double-basque in the back, but doesn't extend around to the front
-Double tier skirt
-The pagoda sleeves (really large, open sleeves to be worn over puffy under sleeves)
-While I did use the color of the last gown, a semi-neutral color isn't helpful. But...I will look for - TASSELS!!

When looking at different 1850's fashion plates, a lot of skirts that look like a triple tier are actually a double skirt, with a basque that acts like a a third tier. Like this:
1858 Ladies' Home Magazine

The above plate is actually almost exactly what I'm looking for. The overall design is exactly the same, and hits 3/4 of the things I'm looking for. The only difference is that the basque extends all the way around, while the original golden dress is only in the back.

Basques:

1855 Peterson's

Basques are generally seen starting in 1855, but the overall dress design and silhouette is a little different than what I'm looking for. 

1855 Peterson's

In the 1858 Ladies Home Magazine, they state:

"As to basques, being confined to walking and home dresses, and not allowable for full dress, they are rather tolerated than commended and will last only another season. This affords a good opportunity for those ladies to whom they are unbecoming, and this includes all but the very tall, to discontinue them." 2

Towards the end of the same year, same magazine, they describe almost the exact same dress, but say that the ladies in Paris and New York think that the basque part of the dress is rather old-fashioned, having been in for 5 or 6 years. 
1857

In 1859, they are still used but are not so common.
In 1860, the references to basques are found mainly to describe coats, and counting the skirt part of the coat as a basque, but generally basques are completely disappeared.

After searching through literally 100 plates....I did not see a single dress with a basque only being attached in the back. I have a theory, but no way to prove it, so take it with a grain of salt.

When something new comes into fashion, it makes sense that, because it is new, you go ahead and make one in the most current style. But after something has been in style for, say, a year or two, and the overall style hasn't changed...you might branch out, and make one in a more unique and creative style. It doesn't make any sense that you would make a unique basque the exact year they have come into fashion, but it does make sense if you are looking to change it up a bit because you've seen the same thing for a year or two. So if we put basques between the years 1855-59...it makes sense that we might be seeing more creativity between 1857-59. I won't use this in the final decision on the dating of this garment, but it is food for thought.

Double skirt:

In 1855, skirts are usually either plain or many flounces. I saw one French plate with a double skirt, on a ball dress.

In 1856, about half and half between double skirts, and more tiers than that.
1856 Peterson's

In 1857, quite a few different number of tiers are being used, but they recommend a double skirt. "....for the plain skirt over a crinoline or hooped petticoat, is rather too balloony in appearance; and numerous flounces do not enliven a skirt which is so distended as to deprive it of drapery; thus the double skirt, here presented, is the accommodation entered into by and between hoops and petticoats." 3
1857 Ladies Home Magazine

In 1858, the Ladies Home Magazine says, 

"The skirt question is the most important one just now, and it seems to be regarded as of too great consequence to render a full decision upon yet, for flounces, double skirts, and quilles (lais de cotes) are equally fashionable."4

1858 Godey's Magazine

In December of 1858 in Godeys magazine, it says, 

"Double skirts are more worn than ever before; nearly all the imported robes, even in the richest cashmeres, mousselines, and all the silk and wool fabrics have them. Where the stripe or ornament occurs alternately, at the distance of a breadth apart, they are called robes a lez." 5

1859 Walking Dress, from Godeys Magazine. 


1859 Godeys Magazine

Tassels:

Interestingly enough, I could not find very many, if any, fashion plates with tassels. Fringe galore, but tassels are only in reference to coats and the like. But after flipping through other extants, there are plenty of examples, they just won't help prove a point.
c. 1858-60 Day dress, via the MET


ca. 1858 Day dress, via the V and A

 And then we have ALL THE FRINGE AND TASSELS....AT THE SAME TIME!!!
c. 1858 Day dress, via the Philadelphia Museum of Art. 

I don't use extants to date other extants, however looking through a list of originals is surprising. Browns, golds, and tans were very popular. If you just scroll through my 1850's Pinterest board, that color scheme is very common. Border prints (meaning large motifs worked across one edge of the fabric, instead of all over) were very popular, because of how well they could be shown off in a tier. Just for fun: the original dresses' twin!
c. 1859 American dress, from the MET

Now, in regards to the sleeves, it's a bit trickier because open sleeves worn with under sleeves was a popular style for a really long time. Take a look at my last research project, where I studied in-depth when that style first came into fashion, which was around 1848. For this particular dress, looking at the exact context and shape is important, because not all open sleeves look alike. 

First, you have sort of a tiny, funnel-shaped sleeve which is very long, coming at least to mid-forearm, but often longer than that:

1849 Godey's Fashion Plate

Then the sleeves graduate to a very long open sleeve, which is often slashed up very high in front. The actual shape of the sleeve is very triangular, and because of the slashing it tends to be very droopy. When I describe triangular, I'm not talking about the points on the sleeve, like this dress has; I'm referring to the way the top of the sleeve comes down from the armhole, with very straight seams. Some curve, especially on the inside of the arm, may be necessary, but especially the back of the arm will be very straight. The under sleeves that are worn with this particular style have to be longer than earlier and later styles, because of how much arm is exposed without them. This style is considered a pagoda sleeve.

1858 Ladies Home Magazine

And then later in the 1860's, the coat sleeve (a shaped, curved style that is fitted to the wrist without any gathers) is meshed with the pagoda to create what is considered an open coat sleeve. It's a little more tailored in appearance, without any droop, but can be anywhere from a modest-sized opening, to gigantic. There is a decided curve in the arm part without any major slashing, coming down to about mid-forearm, or slit a little up to the elbow, but not above. One key fact with open coat sleeves, is that it is generally curved enough to fit around the under sleeve that the inside part of the open sleeve doesn't show. With this golden dress, they took the time to trim the inside of the sleeve...because it was meant to be shown. The fancy lining and box-pleated trim would have looked amazing, drooping down over an under sleeve. So this dress has pagoda sleeves. Both the pagoda and open coat were worn up until 1862, but generally the droopy triangle shape is not so much worn. 
1862 Petersons' Magazine

This particular dress has pagoda sleeves, based on the fact that there isn't any crazy shaping. There is a small slash, but it doesn't come up very far. It's a bit generic, and style could have been worn anywhere between 1855-1860.

Overall conclusion: 1856-59, but really leaning more towards 1857-58.

I can't attach every single 1850's gown from my research board, but if you feel like looking through it, it's really easy to see a lot of similarities. Double tier, basque, open sleeves.....tell me if you find any with tassels used in this way!


5 Godey's Magazine, Volume 57, Page 570

Link to a Pinterest board with original 1850's dresses:
https://www.pinterest.com/michaelacoy9/1850-1859-day-dress/
Link to Pinterest board with 1850's fashion plates:
https://www.pinterest.com/michaelacoy9/1850-1859-fashion-plates/