Showing posts with label Children's Clothing. Show all posts

Monday, August 7, 2017

#7: Made for Someone Else

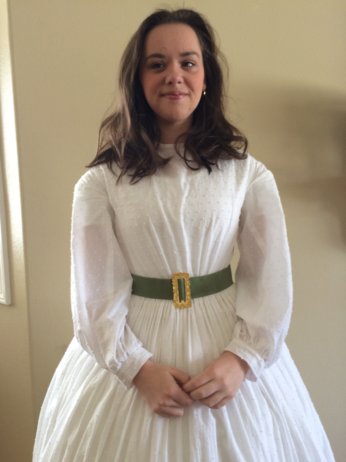
This dress was made just for fun. Camille was wanting a nice dress that could be worn with a hoop, so the hoop is new as well. This dress was made around a year ago, and has been worn maybe 3 times since then. We don't get out much.

The half-high lining that shadows through you can kind of see in the upper sleeve. The lining is boned, and buttons up the back. It's a seperate garment, so it can be washed without the dress.

I really wanted to recreate this particular fashion plate from 1862, but Camille wanted a high-necked, long-sleeved dress with a half-high lining. She once wore a low-necked, short sleeved dress to an event, and she burned her upper shoulder and neck area really badly. So I think she sees the practicality of covering more skin, so it is practical for outdoor wear, despite being white. This fabric is relatively easy to spot treat/scrub.
1862 Magasin des Demoiselles fashion plate

At some point I would really like to make this fancy belt with a sash; I think it's awesome, but she doesn't care for it.

This was the first dress were I allowed a significant drop in overall length; it feels much longer than her previous dresses. Almost full length, but in reality is still 8'' off the ground.

The bound ruffles are what inspired the trimmed tucks; I don't have documentation for silk-trimmed tucks, but the overall effect is plausible. We have plans to sew on covered buttons down the back.

This belt buckle is from Ensembles of the Past. It is absolutely beautiful, and I really want one in every color!

The bonnet was made in winter of 2015. It looks very well with the entire dress.

The hoop was made using The Laced Angel's instructions. Most of the hoop measurements were used, with slight modifications. This is the first day dress she's worn with a hoop.

Wednesday, July 1, 2015

Updated Old Brown Dress

You remember this dress? This was the first dress I made for Camille. The fabric is really heavy, and I have no idea why she wanted long sleeves in the first place. Because most of the Civil War events are in the summer, she gets really hot.

Well, after making this dress, which has short sleeves, the brown dress got laid aside. Now, the plaid dress is faded beyond all reason from multiple washings.

I am in love with the yoked bodice, and didn't want to see it not getting used, soooo....


Now it looks even better than before! Plus, she has her new stays on. I ripped the old sleeves off and lopped off the length, instead of using new fabric. I don't know why, but I felt the urge to hand sew the whole sleeve. 


Some hair flipping action:


And then she didn't want to take it off. 


This will be her second year owning this dress, and I'm really excited about how it's holding up, and how it currently fits.

Tuesday, June 30, 2015

Historical Sew Monthly Challenge #6: Out of Your Comfort Zone

It seemed like the obvious choice for this particular sewing challenge, but I chose to make corded stays for an older girl. The reason it is out of my comfort zone: after seeing the disastrous results over time from a poorly constructed corset, I was nervous to make another one. And, I have never made anything with cording before, unless piping on a garment counts.

Cording is the act of sewing tiny channels into the clothing, and then running cord (more like what you might picture as kitchen string) through them. It stiffens in place of boning, or other supporting method like quilting. I also think it makes the finished product easier to wash.

If you've ever seen the tutorials for a duct-tape double, I used something a little like that for the pattern. Not taping the whole body, and then cutting the whole thing vertically into strips for the corset pattern. It worked really well, and then I just did a basic draft for the straps.

When looking at it, it almost looks like one of those earlier 19th century stays because it has no separating front busk, but the originals from that era come down considerably more. By the mid-19th century, only girls wore straps on their stays (or corsets, its the same type of garment). Next time, I think I will put in a separating front because it is a pain just to get it over her head.
She's the cutest :)


What the item is (and why it was out of your comfort zone): Corded stays (or work corset) for older girl; new cording techniques being used, + a couple hand stitched eyelets.


The Challenge: Out of Your Comfort Zone


Fabric: 1 1/2 yards cotton sateen (the whole thing wasn't used)


Pattern: My own.


Year: Mid-19th century


Notions: Thread, cording, grommets


How historically accurate is it? I have no idea. Maybe 70%; that's just a random number thrown out there.


Hours to complete:  Around 12-14. 


First worn: For pictures


Total cost: About $15; I only had to pay for the fabric and grommet refills.


All in all, I really liked working with the sateen better than cotton twill, mostly because of the soft, lightweight feel. I'm not sure how it'll hold up long-term, but I suspect she'll grow out of it in a couple years anyway.

I also plan on removing the very back cording, the row that's right between the grommets. It likes to collapse (but not so bad on the finished product as I thought), so I thought I would replace it with steel boning. I was trying really hard not to spend too much on this project because of future projects, and shipping from corsetmaking.com is expensive, even for two measly little bones. I'm waiting until I need more supplies from there before ordering. I also have yet to buy any real lacing stuff, but the cording works even if it isn't glamorous.

She's really pleased that she no longer looks 'fluffy' with a dress on; wearing a chemise without a corset on over it does tend to make you a little puffier than usual.

And, just because.....


Wednesday, May 20, 2015

Cute Homespun Girl's Dress


During December, I was desperate for a project. All my Christmas stuff was done, and I was not looking forward to working on my corset. So I dragged Mom out to Joann's and bought stuff for a dress for Camille. That very day (I think it was the week of Christmas) I wrapped it up and gave the fabric to her as a present. Love those socks!


Camille helped me design it. My ideas and her desires didn't quite match up. I knew it would turn out cute either way. I liked the idea of a wide neckline with quite a few gathers along the top into a bias strip, but she wanted a smooth bodice. I liked the idea of short, straight sleeves and she liked short, puffed sleeves. 


I draped it all myself, except for the sleeves which came from the ball dress pattern I have.

The dress pulled together really well. No real trouble was given me, other than the fact that the wide, smooth neckline she wanted wouldn't stop gaping. I kept putting a larger and larger dart in the mockup right in the middle. In theory it should have worked, but in reality it was just altering the shape of the neckline instead of fixing the gaping. 

Finally, I just cut it out with several theory's on how to fix it:

1. Bind up the neckline anyway with piping and hope it was only gaping due to the curve being on the bias and stretching out,

2. Bind up the neckline and run a string through the piping, tying it in the back to help eliminate gaping. I was skeptical to this idea, because I didn't want it to be obvious or look like a drawstring neckline,

3. Put just a couple gathers in the very front and bind it up. 

I ended up using method #3. It worked perfectly, and when Camille tried it on for the first time, she didn't even notice until I asked her how she liked it. Win win!


I know you're probably wondering; if I started the dress in December, and finished it in February, then why oh why hasn't there been any pictures up until now? The answer: everything was going well, until she put it on for pictures and GASP. The center pleat was skewed way off center. And I didn't actually fix it up until several weeks ago, when she wanted to wear it for the first time. It was an easy solution, but it kept getting stalled.

The piping was easier than it usually is. USUALLY, I end up having to sew each strip twice because of something funky the feed dogs on my machine pulled on the bias. OR I accidentally put a stitch in the cord, and that doesn't work because it causes funny puckers, and then you have to find where that stitch is. Either I lucked out, or my new machine just works better.

This was my first time changing directions of pleats on a skirt, and also my first time putting more fabric in the back half of the skirt on purpose. Neither was particularly hard, nor did it take very much extra time. Whether both are very noticeable is yet to be determined.

I'm happy with how it turned out. The only thing I don't like is how perfectly it fits across the chest; there isn't any room for growth. That's a pretty big improvement from the long list of what I usually would do differently! Oh, I suppose I wasn't very happy with the fabric. I adore this plaid, but it was really course. 

The final consensus: she loves the wide neck and sleeves, and it made all the difference in her comfort. Plus, the fabric is a little bit lighter than the brown and pink one.

Monday, May 18, 2015

A Drawstring Chemise

For those of you that don't know, whenever I finish a large sewing project, I quickly try to cram in as many small, neccesary sewing things as I can before the next inspiration comes. Once I'm into something big, I can barely sew anything else until it's finished.

In the last week I've made a bonnet, a pinafore, and this chemise:


Thankfully, whatever horrible drafting mistakes I made on the last chemise I was able to work out, into one nice-fitting one. I'm not sure exactly how accurate a drawstring neck is, but it's functional for my purposes. The only problem: the ribbon keeps getting lost in the casing when untied. Therefore, it needs to always be tied.

Tuesday, August 19, 2014

Un-Split Drawers for Sis

I finally got around to making drawers for both Camille and I. Thankfully I only have pictures of Camille's, hers look a lot better on her than mine do. Mine look like they were designed for a hippo!

Annyway, I would have made hers a little longer, but I really wanted to use a certain piece of fabric. So I sewed a tucked strip onto the edge, and you can't even tell, really. Except that they still didn't turn out as long as I might have wanted. Oh well. They are, according to her, 'my new favorite undergarment'.

She really didn't want split drawers, and since she isn't in a corset or hoop skirt, I sewed the crotch seam closed. I used these instructions here: http://www.thesewingacademy.com/wp-content/uploads/2011/04/2010Drawers.pdf

Monday, August 18, 2014

1865 Children's Red Wool Dress

It seems kind of weird that you can't tell, but this dress could be for either a boy or a girl. Small boys wore dresses until they were about six, and then they would dress more like a boy in trousers. This dress is small enough that it could be for either. To me, it looks like a boy's dress, just because of the pleats all over the place.

Long sleeves, with pleats on the armscye and the wrist. Knife pleats on the bodice, with double inverted box pleats around the skirt. Black trim on the cuffs, waistband, skirt edge, and on the shoulder edge. It's pretty cute.