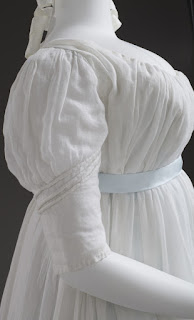
This dress was first completed last October. It was my first real attempt at an accurate Regency dress; I'm pretty happy with how it turned out. I chose the design because of the Neoclassical lines; I also loved the sleeves, the length and drape of the train, the gathers in the front with pleats in the back. It's simple enough that it could be worn anywhere between 1795-1802, or even later depending on who wore it. This is a reproduction from the LACMA; the original dress is c. 1795. Because I raised the waistline into more of a true Regency empire waistline, it's just a tad later.
Sleeve detail comparisons
I lopped the sleeves off my chemise, and I didn't realize until we got into better light that the show-through looked a little weird...
The construction was pretty simple; after doing some research, I took the Simplicity 4055 that never ends, even though I really am disliking that pattern every time I use it. I had to hack it pretty hard; I took a strip of muslin and figured out the fulness ratio I wanted across the bust, then transferred that to a well-fitting mockup.
This picture turned out so crazy!
I was stumped at first as to how you would get dressed in this dress. The back is cut on a fold....there's no apron-front....and the front is cut on a fold. Huh. It took me a while of pondering and asking around before I realized...that it actually didn't need it. It has a drawstring that runs from the shoulders to the front, and a drawstring from the side seams to the front. To get it on...pull it open, then it just goes right over your head and you pull up the strings and it ties on the inside. It really is the most adjustable dress in the world; it fits my sister who is a different shape and size as well.
It didn't occur to me that, with the more pure Neoclassical lines of the dress, the waist should have been not so close to the bust, but more dropped. Whoever dressed the mannequin of the original dress had to take a complete shot in the dark in regards to how big the lady who wore it was in the bust; with a drawstring top and bottom, it's anyone's guess. This mannequin is more busty, but it could have been a smaller lady, in which case the waist would have laid not so high on her. Oh well. Live and learn.
I also learned, through purchasing Cassidy Percoco's Regency Women's Fashion and looking at the diagrams, that this type of construction you would have cut the front bodice and skirt in one long piece, and run a drawstring through that. So ridiculously easy! Except I was convinced that the skirt needed ALL. THE. GATHERS. But I didn't want to look puffy on top. So I lightly gathered the skirt to the bodice, then put a drawstring on. My only regret, in this whole design, was over-doing it on the skirt gathers. If I had known that cutting them in one was a thing, I would have tried it.
The sleeves were interesting. Last year, I ran out of time and sewed on quick puffs. After wearing it to the ball, I decided it was way too boring; with the train pinned up, it was your basic, boring little white Regency dress. So this year, I went back to the original design and created a shaped cuff, with cord sewn in for a 3-D swoop. I made the cuff the overall correct length on one side, then sewed it to another side that was overly long. Then I sewed a curved line.
Next I laid the cord inside it, pushing it up against the stitching as close as possible.
Rather than sewing the piping evenly sandwiched between the cords, I rolled the cord even further past the stitch line so that it's basically only being held by the outer layer.
I just recycled the old puff, but I had to mess with the shape of it to get it to lay correctly without any weird puffs in the underarm area.
The first time around where it wouldn't lay right.
Corrected underarm, about to be topstitched.
I will talk about the hairstyle in another post!


I LOVE Regency fashions on mannequins but my main beef with them is that most of the dresses on me tend to look like the "might possibly be pregnant but trying to hide it" style. Haha. This would probably be helped by more accurate stays... but I need to make time for that... ahem.
ReplyDeleteAnyway, your dress looks FAB, as always. Did you happen to get any more detailed shots of the finished sleeves? I enlarged your full-length photos to look, but would love to see some up-close shots as well. Gorgeous ensemble! You did an amazing job!
Hey there!
DeleteSadly, I did NOT get any close-ups, although I did update the post with a few pictures that are a smidgen closer. I may get it on my dressform and get a picture or two that way.
By the way, I made Melody's stays out of the Laughing Moon pattern (which is a GOOD pattern), using the theatrical version (to save time). I made the more accurate version with the cording, and the final product is not that different. It gives you the same line, with 10x less work. I would recommend doing the gussets on the accurate one, the theatrical gussets were weird.
Oh my goodness, this is SO PRETTY. Beautiful work!
ReplyDeleteThanks Crystal! Will I be seeing you at Costume College?
Delete